
下面的东西是编写自定义的表情键盘,话不多说,开门见山吧!下面主要用到的知识有MVC, iOS开发中的自动布局,自定义组件的封装与使用,Block回调,CoreData的使用。有的小伙伴可能会问写一个自定义表情键盘肿么这么麻烦?下面将会介绍我们如何用上面提到的东西来定义我们的表情键盘。下面的内容会比较多,这篇博文还是比较有料的。
还是那句话写技术博客是少不了代码的,下面会结合代码来回顾一下iOS的知识,本篇博文中用到的知识点在前面的博客中都能找到相应的内容,本篇算是一个小小的功能整合。先来张图看一下本app的目录结构。我是根据自己对MVC的理解来构建的目录结构,希望起到抛砖引玉的作用,有好的解决方案欢迎评论或者留言指出。Face文件中存放的时我们的表情图片,Model文件封装的是从sqlite中读取历史头像的组件,View文件中封装的时我们自定义的组件,也就是自定义键盘相关的视图,Controller负责将我们的各个组件组装到一起完成我们想要的功能。下面会一一介绍。
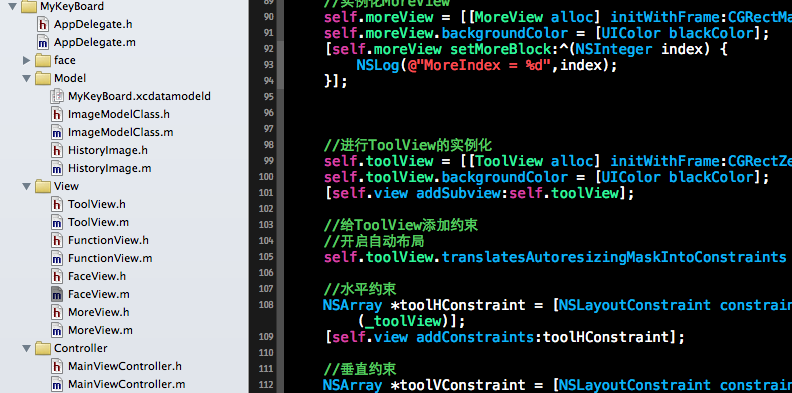
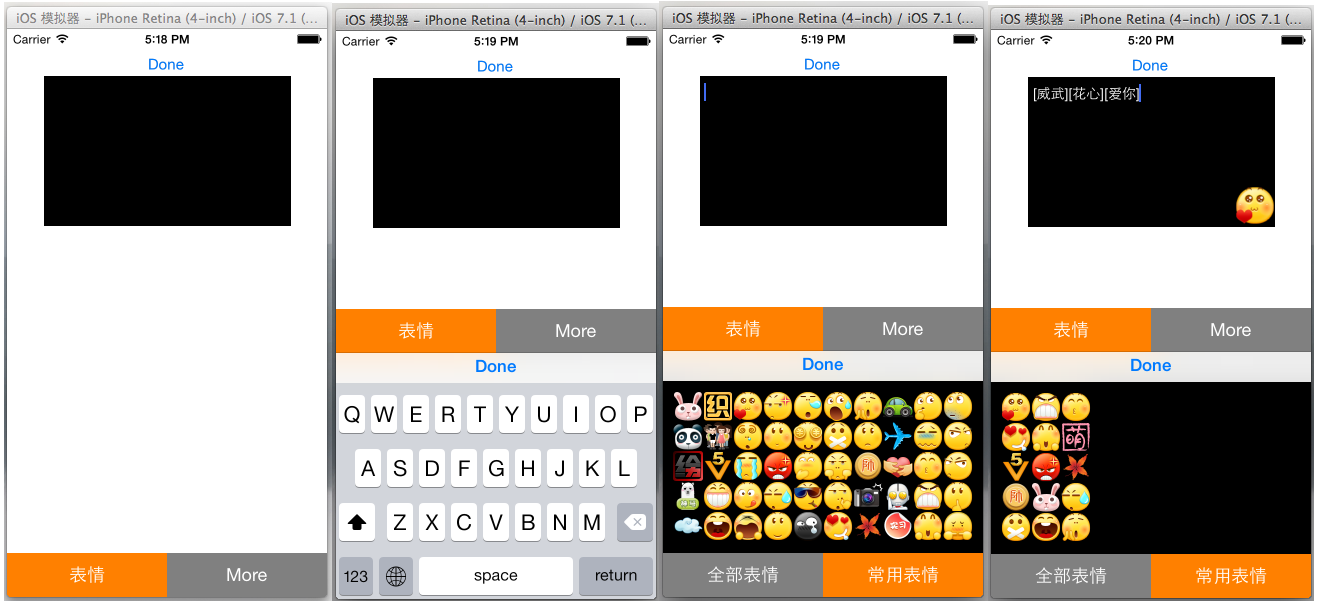
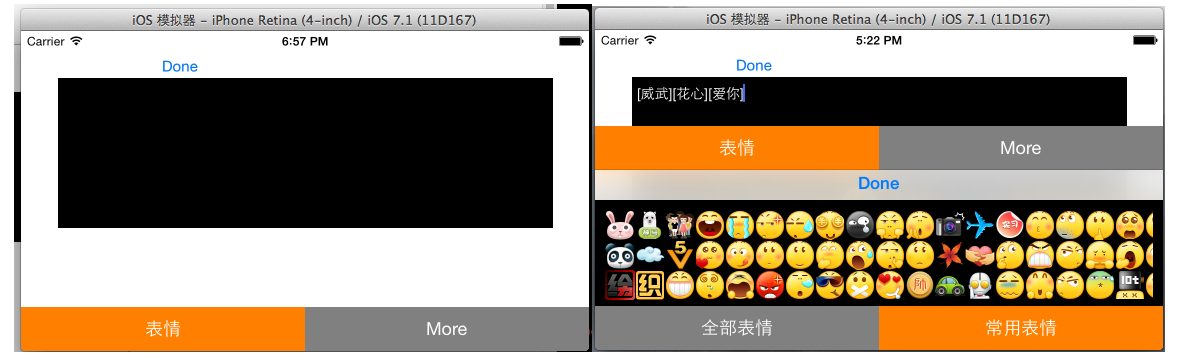
上面是文件的组织结构,下面为了更为直观的了解我们想要的效果,下面先看几张截图,来直观的感受一下运行效果,上面是竖屏的显示效果,下面是横屏的显示效果。因为在封装自定义键盘中用到了自动布局所以横屏显示或者在更大的屏幕上显示是没问题的,常用表情是用户用过的表情,然后存在Sqlite中,显示时并按时间降序排列。more是用来扩展功能用的接口。话不多说,来的代码才是实在的。
一.View(自定义视图)
View文件夹下存放的时我们自定义的视图组件,因为是自定义的组件所以storyboard我们就用不了啦,所有的代码都必须手写,这样才能保证组件使用的灵活性和减少各个组件之间的耦合性,更利于团队之间的合作。在封装组件时要预留好外界可能使用到的接口,和返回该返回的数据。好啦,废话少说,来点干货吧!
1、FaceView组件的封装:FaceView即负责显示一个个的头像。在使用该组件时要传入要显示的图片和图片对应的文字(如【哈哈】),当点击图片的时候,会通过block回调的形式把该图片的image以及图片文字返回到使用的组件中去,下面是关键代码:
FaceView.h中的代码如下(下面代码是定义啦相应的Block类型和对外的接口):


 1 #import <UIKit/UIKit.h>
 2
 3 //声明表情对应的block,用于把点击的表情的图片和图片信息传到上层视图
 4 typedef void (^FaceBlock) (UIImage *image, NSString *imageText);
 5
 6 @interface FaceView : UIView
 7
 8 //图片对应的文字
 9 @property (nonatomic, strong) NSString *imageText;
10 //表情图片
11 @property (nonatomic, strong) UIImage *headerImage;
12
13 //设置block回调
14 -(void)setFaceBlock:(FaceBlock)block;
15
16 //设置图片,文字
17 -(void)setImage:(UIImage *) image ImageText:(NSString *) text;
18
19 @end
View Code
FaceView.m中的代码如下
 1 //
 2 //  FaceView.m
 3 //  MyKeyBoard
 4 //
 5 //  Created by 青玉伏案 on 14-9-16.
 6 //  Copyright (c) 2014年 Mrli. All rights reserved.
 7 //
 8
 9 #import "FaceView.h"
10
11 @interface FaceView ()
12 @property(strong, nonatomic) FaceBlock block;
13 @property (strong, nonatomic) UIImageView *imageView;
14 @end
15
16 @implementation FaceView
17
18 //初始化图片
19 - (id)initWithFrame:(CGRect)frame
20 {
21     //face的大小
22     frame.size.height = 30;
23     frame.size.width = 30;
24     self = [super initWithFrame:frame];
25     if (self) {
26         self.imageView = [[UIImageView alloc] initWithFrame:CGRectMake(0, 0, 30, 30)];
27         [self addSubview:self.imageView];
28     }
29     return self;
30 }
31
32 -(void) setFaceBlock:(FaceBlock)block
33 {
34     self.block = block;
35 }
36
37
38 -(void) setImage:(UIImage *)image ImageText:(NSString *)text
39 {
40     //显示图片
41     [self.imageView setImage:image];
42
43     //把图片存储起来
44     self.headerImage = image;
45
46     self.imageText = text;
47 }
48
49 //点击时回调
50 -(void)touchesEnded:(NSSet *)touches withEvent:(UIEvent *)event
51 {
52     UITouch *touch = [touches anyObject];
53     CGPoint point = [touch locationInView:self];
54     //判断触摸的结束点是否在图片中
55     if (CGRectContainsPoint(self.bounds, point))
56     {
57         //回调,把该头像的信息传到相应的controller中
58         self.block(self.headerImage, self.imageText);
59     }
60 }
61
62 @end
View Code
代码说明:
主要就是block回调的使用,就是封装了一个自定义的button,具体内容请参考之前的博客“IOS开发之自定义Button(集成三种回调模式)”
2、FunctionView组件的封装,FunctionView就是使用FaceView组件和ScrollView组件把表情加载进来,在实例化FunctionView组件时,我们用到了自动布局来设置ScrollView和下面的Button
FunctionView.h的代码如下,在.h中留有组件的接口和回调用的Block, plistFileName用于加载我们的资源文件时使用,至于如何使用plist文件,请参考之前的博客:IOS开发之显示微博表情
 1 //
 2 //  FunctionView.h
 3 //  MyKeyBoard
 4 //
 5 //  Created by 青玉伏案 on 14-9-16.
 6 //  Copyright (c) 2014年 Mrli. All rights reserved.
 7 //
 8
 9 #import <UIKit/UIKit.h>
10
11 //定义对应的block类型,用于数据的交互
12 typedef void (^FunctionBlock) (UIImage *image, NSString *imageText);
13
14 @interface FunctionView : UIView
15 //资源文件名
16 @property (nonatomic, strong) NSString *plistFileName;
17 //接受block块
18 -(void)setFunctionBlock:(FunctionBlock) block;
19
20 @end
View Code
FunctionView.m中的代码如下,常用表情是在sqlite中获取的,而全部表情是通过plist文件的信息在Face文件中加载的:
  1 //
  2 //  FunctionView.m
  3 //  MyKeyBoard
  4 //
  5 //  Created by 青玉伏案 on 14-9-16.
  6 //  Copyright (c) 2014年 Mrli. All rights reserved.
  7 //
  8
  9 #import "FunctionView.h"
 10 #import "FaceView.h"
 11 #import "ImageModelClass.h"
 12 #import "HistoryImage.h"
 13
 14 @interface FunctionView()
 15
 16 @property (strong, nonatomic) FunctionBlock block;
 17 //暂存表情组件回调的表情和表情文字
 18 @property (strong, nonatomic) UIImage *headerImage;
 19 @property (strong, nonatomic) NSString *imageText;
 20
 21 //display我们的表情图片
 22 @property (strong, nonatomic) UIScrollView *headerScrollView;
 23
 24 //定义数据模型用于获取历史表情
 25 @property (strong, nonatomic) ImageModelClass *imageModel;
 26
 27 @end
 28
 29
 30 @implementation FunctionView
 31 - (id)initWithFrame:(CGRect)frame
 32 {
 33     self = [super initWithFrame:frame];
 34     if (self) {
 35
 36         //实例化数据模型
 37         self.imageModel =[[ImageModelClass alloc] init];
 38
 39         //实例化下面的button
 40         UIButton *faceButton = [[UIButton alloc] initWithFrame:CGRectZero];
 41         faceButton.backgroundColor = [UIColor grayColor];
 42
 43         [faceButton setTitle:@"全部表情" forState:UIControlStateNormal];
 44         [faceButton setShowsTouchWhenHighlighted:YES];
 45         [faceButton addTarget:self action:@selector(tapButton1:) forControlEvents:UIControlEventTouchUpInside];
 46         [self addSubview:faceButton];
 47
 48
 49         //实例化常用表情按钮
 50         UIButton *moreButton = [[UIButton alloc] initWithFrame:CGRectZero];
 51         moreButton.backgroundColor = [UIColor orangeColor];
 52         [moreButton setTitle:@"常用表情" forState:UIControlStateNormal];
 53         [moreButton setShowsTouchWhenHighlighted:YES];
 54         [moreButton addTarget:self action:@selector(tapButton2:) forControlEvents:UIControlEventTouchUpInside];
 55         [self addSubview:moreButton];
 56
 57         //给按钮添加约束
 58         faceButton.translatesAutoresizingMaskIntoConstraints = NO;
 59         moreButton.translatesAutoresizingMaskIntoConstraints = NO;
 60         //水平约束
 61         NSArray *buttonH = [NSLayoutConstraint constraintsWithVisualFormat:@"H:|[faceButton][moreButton(==faceButton)]|" options:0 metrics:0 views:NSDictionaryOfVariableBindings(faceButton,moreButton)];
 62         [self addConstraints:buttonH];
 63
 64         //垂直约束
 65         NSArray *button1V = [NSLayoutConstraint constraintsWithVisualFormat:@"V:[faceButton(44)]|" options:0 metrics:0 views:NSDictionaryOfVariableBindings(faceButton)];
 66         [self addConstraints:button1V];
 67
 68         NSArray *button2V = [NSLayoutConstraint constraintsWithVisualFormat:@"V:[moreButton(44)]|" options:0 metrics:0 views:NSDictionaryOfVariableBindings(moreButton)];
 69         [self addConstraints:button2V];
 70
 71         //默认显示表情图片
 72         [self tapButton1:nil];
 73
 74     }
 75     return self;
 76 }
 77
 78 //接受回调
 79 -(void)setFunctionBlock:(FunctionBlock)block
 80 {
 81     self.block = block;
 82 }
 83
 84 //点击全部表情按钮回调方法
 85 -(void)tapButton1: (id) sender
 86 {
 87     // 从plist文件载入资源
 88     NSBundle *bundle = [NSBundle mainBundle];
 89     NSString *path = [bundle pathForResource:self.plistFileName ofType:@"plist"];
 90     NSArray *headers = [NSArray arrayWithContentsOfFile:path];
 91
 92     if (headers.count == 0) {
 93         NSLog(@"访问的plist文件不存在");
 94     }
 95     else
 96     {
 97         //调用headers方法显示表情
 98         [self header:headers];
 99     }
100 }
101
102 //点击历史表情的回调方法
103 -(void) tapButton2: (id) sender
104 {
105     //从数据库中查询所有的图片
106     NSArray *imageData = [self.imageModel queryAll];
107     //解析请求到的数据
108     NSMutableArray *headers = [NSMutableArray arrayWithCapacity:imageData.count];
109
110     //数据实体,相当于javaBean的东西
111     HistoryImage *tempData;
112
113     for (int i = 0; i < imageData.count; i ++) {
114         tempData = imageData[i];
115
116         //解析数据,转换成函数headers要用的数据格式
117         NSMutableDictionary *dic = [NSMutableDictionary dictionaryWithCapacity:2];
118         [dic setObject:tempData.imageText forKey:@"chs"];
119         UIImage *image = [UIImage imageWithData:tempData.headerImage];
120         [dic setObject:image forKey:@"png"];
121
122         [headers addObject:dic];
123     }
124
125     [self header:headers];
126
127 }
128
129
130 //负责把查出来的图片显示
131 -(void) header:(NSArray *)headers
132 {
133     [self.headerScrollView removeFromSuperview];
134     self.headerScrollView = [[UIScrollView alloc] initWithFrame:CGRectZero];
135     [self addSubview:self.headerScrollView];
136
137     //给scrollView添加约束
138     self.headerScrollView.translatesAutoresizingMaskIntoConstraints = NO;
139     //水平约束
140     NSArray *scrollH = [NSLayoutConstraint constraintsWithVisualFormat:@"H:|-10-[_headerScrollView]-10-|" options:0   metrics:0 views:NSDictionaryOfVariableBindings(_headerScrollView)];
141     [self addConstraints:scrollH];
142
143     //垂直约束
144     NSArray *scrolV = [NSLayoutConstraint constraintsWithVisualFormat:@"V:|-10-[_headerScrollView]-50-|" options:0 metrics:0 views:NSDictionaryOfVariableBindings(_headerScrollView)];
145     [self addConstraints:scrolV];
146
147
148
149     CGFloat scrollHeight = (self.frame).size.height-60;
150
151     //根据图片量来计算scrollView的Contain的宽度
152     CGFloat width = (headers.count/(scrollHeight/30))*30;
153     self.headerScrollView.contentSize = CGSizeMake(width, scrollHeight);
154     self.headerScrollView.pagingEnabled = YES;
155
156
157     //图片坐标
158     CGFloat x = 0;
159     CGFloat y = 0;
160
161     //往scroll上贴图片
162     for (int i = 0; i < headers.count; i ++) {
163         //获取图片信息
164         UIImage *image;
165         if ([headers[i][@"png"] isKindOfClass:[NSString class]])
166         {
167              image = [UIImage imageNamed:headers[i][@"png"]];
168         }
169         else
170         {
171             image = headers[i][@"png"];
172         }
173
174         NSString *imageText = headers[i][@"chs"];
175
176         //计算图片位置
177         y = (i%(int)(scrollHeight/30)) * 30;
178         x = (i/(int)(scrollHeight/30)) * 30;
179
180         FaceView *face = [[FaceView alloc] initWithFrame:CGRectMake(x, y, 0, 0)];
181         [face setImage:image ImageText:imageText];
182
183         //face的回调,当face点击时获取face的图片
184         __weak __block FunctionView *copy_self = self;
185         [face setFaceBlock:^(UIImage *image, NSString *imageText)
186          {
187              copy_self.block(image, imageText);
188          }];
189
190         [self.headerScrollView addSubview:face];
191     }
192
193     [self.headerScrollView setNeedsDisplay];
194
195 }
196
197 @end
View Code
代码说明:
1、主要是通过对资源文件或者对从数据库中查询的资源进行遍历然后添加到ScrollView中
2.为了适应不同的屏幕给相应的组件添加了约束
3.ToolView组件的封装: ToolView就是在主屏幕上下面的类似于TabBar的东西,当键盘出来的时候,ToolView会运动到键盘上面的位置。为了使用不同的屏幕,也需要用自动布局来实现。
ToolView.h的代码如下:预留组件接口和声明block类型
 1 //
 2 //  ToolView.h
 3 //  MyKeyBoard
 4 //
 5 //  Created by 青玉伏案 on 14-9-16.
 6 //  Copyright (c) 2014年 Mrli. All rights reserved.
 7 //
 8
 9 /*****************
10  封装下面的工具条组件
11  *****************/
12 #import <UIKit/UIKit.h>
13
14 //定义block块变量类型,用于回调,把本View上的按钮的index传到Controller中
15 typedef void (^ToolIndex) (NSInteger index);
16
17 @interface ToolView : UIView
18
19 //块变量类型的setter方法
20 -(void)setToolIndex:(ToolIndex) toolBlock;
21
22 @end
View Code
ToolView.m的代码实现:
 1 //
 2 //  ToolView.m
 3 //  MyKeyBoard
 4 //
 5 //  Created by 青玉伏案 on 14-9-16.
 6 //  Copyright (c) 2014年 Mrli. All rights reserved.
 7 //
 8
 9 #import "ToolView.h"
10
11 @interface ToolView ()
12
13 //定义ToolIndex类型的block,用于接受外界传过来的block
14 @property (nonatomic, strong) ToolIndex myBlock;
15
16 @end
17
18
19 @implementation ToolView
20
21 - (id)initWithFrame:(CGRect)frame
22 {
23     self = [super initWithFrame:frame];
24     if (self) {
25
26         //1初始化表情按钮
27         UIButton *faceButton = [[UIButton alloc] initWithFrame:CGRectZero];
28         faceButton.backgroundColor = [UIColor orangeColor];
29         [faceButton setTitle:@"表情" forState:UIControlStateNormal];
30         [faceButton setShowsTouchWhenHighlighted:YES];
31         [faceButton addTarget:self action:@selector(tapFaceButton:) forControlEvents:UIControlEventTouchUpInside];
32         [self addSubview:faceButton];
33
34
35         //初始化更多按钮
36         UIButton *moreButton = [[UIButton alloc] initWithFrame:CGRectZero];
37         moreButton.backgroundColor = [UIColor grayColor];
38         [moreButton setTitle:@"More" forState:UIControlStateNormal];
39         [moreButton setShowsTouchWhenHighlighted:YES];
40         [moreButton addTarget:self action:@selector(tapMoreButton:) forControlEvents:UIControlEventTouchUpInside];
41         [self addSubview:moreButton];
42
43
44         //给我们的按钮添加约束来让按钮来占满toolView;
45         faceButton.translatesAutoresizingMaskIntoConstraints = NO;
46         moreButton.translatesAutoresizingMaskIntoConstraints = NO;
47
48         //添加水平约束
49         NSArray *buttonH = [NSLayoutConstraint constraintsWithVisualFormat:@"H:|[faceButton][moreButton(==faceButton)]|" options:0 metrics:0 views:NSDictionaryOfVariableBindings(faceButton,moreButton)];
50         [self addConstraints:buttonH];
51
52         //添加垂直约束
53         NSArray *button1V = [NSLayoutConstraint constraintsWithVisualFormat:@"V:|[faceButton]|" options:0 metrics:0 views:NSDictionaryOfVariableBindings(faceButton)];
54         [self addConstraints:button1V];
55
56         NSArray *button2V = [NSLayoutConstraint constraintsWithVisualFormat:@"V:|[moreButton]|" options:0 metrics:0 views:NSDictionaryOfVariableBindings(moreButton)];
57         [self addConstraints:button2V];
58
59     }
60     return self;
61 }
62
63 //接受传入的回调
64 -(void) setToolIndex:(ToolIndex)toolBlock
65 {
66     self.myBlock = toolBlock;
67 }
68
69 //点击表情按钮要回调的方法
70 -(void) tapFaceButton: (id) sender
71 {
72     self.myBlock(1);
73 }
74
75 //点击more要回调的方法
76 -(void) tapMoreButton: (id) sender
77 {
78     self.myBlock(2);
79 }
80
81 @end
View Code
代码说明:
主要是对block回调的应用和给相应的组件添加相应的约束
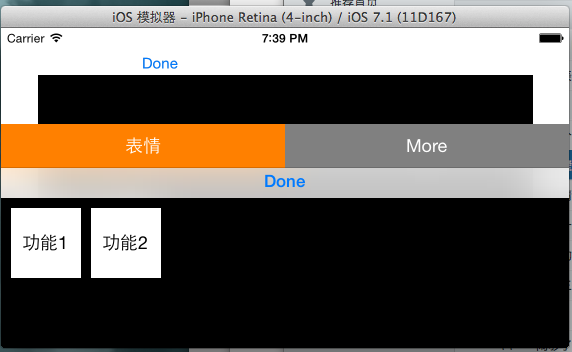
4.MoreView组件的封装代码就不往上贴啦,和上面的类似,下面是调用MoreView组件的运行效果,有兴趣的读者请自行编写,以上就是视图部分的代码了
二. Mode部分的内容:
1.先定义我们要使用的数据模型,数据模型如下,time是使用表情的时间,用于排序。

2.下面编写我们的ImageModelClass类,里面封装了我们操作数据要用的方法
ImageModelClass.h的代码如下,主要是预留的对外的接口:
 1 //
 2 //  ImageModelClass.h
 3 //  MyKeyBoard
 4 //
 5 //  Created by 青玉伏案 on 14-9-16.
 6 //  Copyright (c) 2014年 Mrli. All rights reserved.
 7 //
 8
 9 #import <Foundation/Foundation.h>
10 #import <CoreData/CoreData.h>
11 #import "HistoryImage.h"
12
13 @interface ImageModelClass : NSObject
14 //保存数据
15 -(void)save:(NSData *) image ImageText:(NSString *) imageText;
16 //查询所有的图片
17 -(NSArray *) queryAll;
18 @end
View Code
ImageModelClass.m的代码如下,主要是用CoreData对sqlite的操作:
  1 //
  2 //  ImageModelClass.m
  3 //  MyKeyBoard
  4 //
  5 //  Created by 青玉伏案 on 14-9-16.
  6 //  Copyright (c) 2014年 Mrli. All rights reserved.
  7 //
  8
  9 #import "ImageModelClass.h"
 10
 11 @interface ImageModelClass ()
 12
 13 @property (nonatomic, strong) NSManagedObjectContext *manager;
 14
 15 @end
 16
 17 @implementation ImageModelClass
 18 - (instancetype)init
 19 {
 20     self = [super init];
 21     if (self) {
 22         //通过上下文获取manager
 23         UIApplication *application = [UIApplication sharedApplication];
 24         id delegate = application.delegate;
 25         self.manager = [delegate managedObjectContext];
 26     }
 27     return self;
 28 }
 29
 30 -(void)save:(NSData *)image ImageText:(NSString *)imageText
 31 {
 32     if (image != nil) {
 33         NSArray *result = [self search:imageText];
 34
 35         HistoryImage *myImage;
 36
 37         if (result.count == 0)
 38         {
 39             myImage = [NSEntityDescription insertNewObjectForEntityForName:NSStringFromClass([HistoryImage class]) inManagedObjectContext:self.manager];
 40             myImage.imageText = imageText;
 41             myImage.headerImage = image;
 42             myImage.time = [NSDate date];
 43         }
 44         else
 45         {
 46             myImage = result[0];
 47             myImage.time = [NSDate date];
 48         }
 49
 50         //存储实体
 51         NSError *error = nil;
 52         if (![self.manager save:&error]) {
 53             NSLog(@"保存出错%@", [error localizedDescription]);
 54         }
 55
 56     }
 57
 58 }
 59
 60
 61 //查找
 62 -(NSArray *)search:(NSString *) image
 63 {
 64     NSArray *result;
 65
 66         //新建查询条件
 67         NSFetchRequest *fetchRequest = [[NSFetchRequest alloc] initWithEntityName:NSStringFromClass([HistoryImage class])];
 68
 69         //添加谓词
 70         NSPredicate *predicate = [NSPredicate predicateWithFormat:@"imageText=%@",image];
 71
 72         //把谓词给request
 73         [fetchRequest setPredicate:predicate];
 74
 75         //执行查询
 76         NSError *error = nil;
 77         result = [self.manager executeFetchRequest:fetchRequest error:&error];
 78         if (error) {
 79             NSLog(@"查询错误:%@", [error localizedDescription]);
 80         }
 81     return result;
 82 }
 83
 84
 85
 86 //查询所有的
 87 -(NSArray *) queryAll
 88 {
 89     //新建查询条件
 90     NSFetchRequest *fetchRequest = [[NSFetchRequest alloc] initWithEntityName:NSStringFromClass([HistoryImage class])];
 91
 92     //添加排序规则
 93     //定义排序规则
 94     NSSortDescriptor *sortDescriptor = [[NSSortDescriptor alloc] initWithKey:@"time" ascending:NO];
 95
 96     //添加排序规则
 97     [fetchRequest setSortDescriptors:@[sortDescriptor]];
 98
 99
100     //执行查询
101     NSError *error = nil;
102     NSArray *result = [self.manager executeFetchRequest:fetchRequest error:&error];
103     if (error) {
104         NSLog(@"查询错误:%@", [error localizedDescription]);
105     }
106
107     return result;
108 }
109
110 @end
View Code
代码说明:
1.保存图片时先查找图片是否存在,如果存在则更新时间,如果不存在则插入数据(写到这感觉想在用Hibernate写东西)。
三.Controller部分,把上面的组件进行组装
1.MainViewController.m中的延展部分的代码如下:
 1 @interface MainViewController ()
 2
 3 //自定义组件
 4 @property (nonatomic, strong) ToolView *toolView;
 5
 6 @property (nonatomic, strong) FunctionView *functionView;
 7
 8 @property (nonatomic, strong) MoreView *moreView;
 9
10 //系统组件
11 @property (strong, nonatomic) IBOutlet UITextView *myTextView;
12
13 @property (strong, nonatomic) NSDictionary *keyBoardDic;
14
15 @property (strong, nonatomic) IBOutlet UIImageView *imageView;
16
17 @property (strong, nonatomic) NSString *sendString;
18
19 //数据model
20 @property (strong, nonatomic) ImageModelClass  *imageMode;
21
22 @property (strong, nonatomic)HistoryImage *tempImage;
23
24 @end
View Code
2.在viewDidLoad中进行组件的初始化和实现组件的Block回调,代码如下
 1 - (void)viewDidLoad
 2 {
 3     [super viewDidLoad];
 4
 5     //从sqlite中读取数据
 6     self.imageMode = [[ImageModelClass alloc] init];
 7
 8
 9     //实例化FunctionView
10     self.functionView = [[FunctionView alloc] initWithFrame:CGRectMake(0, 0, 320, 216)];
11     self.functionView.backgroundColor = [UIColor blackColor];
12
13     //设置资源加载的文件名
14     self.functionView.plistFileName = @"emoticons";
15
16     __weak __block MainViewController *copy_self = self;
17     //获取图片并显示
18     [self.functionView setFunctionBlock:^(UIImage *image, NSString *imageText)
19      {
20          NSString *str = [NSString stringWithFormat:@"%@%@",copy_self.myTextView.text, imageText];
21
22         copy_self.myTextView.text = str;
23         copy_self.imageView.image = image;
24
25         //把使用过的图片存入sqlite
26          NSData *imageData = UIImagePNGRepresentation(image);
27          [copy_self.imageMode save:imageData ImageText:imageText];
28     }];
29
30
31     //实例化MoreView
32     self.moreView = [[MoreView alloc] initWithFrame:CGRectMake(0, 0, 0, 0)];
33     self.moreView.backgroundColor = [UIColor blackColor];
34     [self.moreView setMoreBlock:^(NSInteger index) {
35         NSLog(@"MoreIndex = %d",index);
36     }];
37
38
39
40     //进行ToolView的实例化
41     self.toolView = [[ToolView alloc] initWithFrame:CGRectZero];
42     self.toolView.backgroundColor = [UIColor blackColor];
43     [self.view addSubview:self.toolView];
44
45     //给ToolView添加约束
46     //开启自动布局
47     self.toolView.translatesAutoresizingMaskIntoConstraints = NO;
48
49     //水平约束
50     NSArray *toolHConstraint = [NSLayoutConstraint constraintsWithVisualFormat:@"H:|[_toolView]|" options:0 metrics:0 views:NSDictionaryOfVariableBindings(_toolView)];
51     [self.view addConstraints:toolHConstraint];
52
53     //垂直约束
54     NSArray *toolVConstraint = [NSLayoutConstraint constraintsWithVisualFormat:@"V:[_toolView(44)]|" options:0 metrics:0 views:NSDictionaryOfVariableBindings(_toolView)];
55     [self.view addConstraints:toolVConstraint];
56
57
58
59
60     //回调toolView中的方法
61     [self.toolView setToolIndex:^(NSInteger index)
62     {
63         NSLog(@"%d", index);
64
65         switch (index) {
66             case 1:
67                 [copy_self changeKeyboardToFunction];
68                 break;
69
70             case 2:
71                 [copy_self changeKeyboardToMore];
72                 break;
73
74             default:
75                 break;
76         }
77
78     }];
79
80
81
82     //当键盘出来的时候通过通知来获取键盘的信息
83     //注册为键盘的监听着
84     NSNotificationCenter *center = [NSNotificationCenter defaultCenter];
85     [center addObserver:self selector:@selector(keyNotification:) name:UIKeyboardWillChangeFrameNotification object:nil];
86
87
88     //给键盘添加dan
89     //TextView的键盘定制回收按钮
90     UIToolbar * toolBar = [[UIToolbar alloc]initWithFrame:CGRectMake(0, 0, 320, 30)];
91
92     UIBarButtonItem * item1 = [[UIBarButtonItem alloc]initWithBarButtonSystemItem:UIBarButtonSystemItemDone target:self action:@selector(tapDone:)];
93     UIBarButtonItem * item2 = [[UIBarButtonItem alloc]initWithBarButtonSystemItem:UIBarButtonSystemItemFlexibleSpace target:nil action:nil];
94     UIBarButtonItem * item3 = [[UIBarButtonItem alloc]initWithBarButtonSystemItem:UIBarButtonSystemItemFlexibleSpace target:nil action:nil];
95     toolBar.items = @[item2,item1,item3];
96
97     self.myTextView.inputAccessoryView =toolBar;
98
99 }
View Code
3.当横竖屏幕切换时设置自定义键盘的高度
 1 -(void)willAnimateRotationToInterfaceOrientation:(UIInterfaceOrientation)toInterfaceOrientation duration:(NSTimeInterval)duration
 2 {
 3     //纵屏
 4     if (UIInterfaceOrientationIsPortrait(toInterfaceOrientation)) {
 5         CGRect frame = self.functionView.frame;
 6         frame.size.height = 216;
 7         self.functionView.frame = frame;
 8         self.moreView.frame = frame;
 9
10     }
11     //横屏
12     if (UIInterfaceOrientationIsLandscape(toInterfaceOrientation)) {
13         CGRect frame = self.functionView.frame;
14         frame.size.height = 150;
15         self.functionView.frame = frame;
16         self.moreView.frame = frame;
17     }
18 }
View Code
4.当键盘出来的时候,改变toolView的位置,通过键盘的通知来实现。当横屏的时候键盘的坐标系和我们当前的Frame的坐标系不一样所以当横屏时得做一坐标系的转换,代码如下;
 1 //当键盘出来的时候改变toolView的位置(接到键盘出来的通知要做的方法)
 2 -(void) keyNotification : (NSNotification *) notification
 3 {
 4     NSLog(@"%@", notification.userInfo);
 5
 6     self.keyBoardDic = notification.userInfo;
 7     //获取键盘移动后的坐标点的坐标点
 8     CGRect rect = [self.keyBoardDic[@"UIKeyboardFrameEndUserInfoKey"] CGRectValue];
 9
10     //把键盘的坐标系改成当前我们window的坐标系
11     CGRect r1 = [self.view convertRect:rect fromView:self.view.window];
12
13     [UIView animateWithDuration:[self.keyBoardDic[UIKeyboardAnimationDurationUserInfoKey] floatValue] animations:^{
14
15         //动画曲线
16         [UIView setAnimationCurve:[self.keyBoardDic[UIKeyboardAnimationCurveUserInfoKey] doubleValue]];
17
18         CGRect frame = self.toolView.frame;
19
20         frame.origin.y = r1.origin.y - frame.size.height;
21
22         //根据键盘的高度来改变toolView的高度
23         self.toolView.frame = frame;
24     }];
25 }
View Code
5.系统键盘和自定义键盘切换的代码如下:
 1 //切换键盘的方法
 2 -(void) changeKeyboardToFunction
 3 {
 4     if ([self.myTextView.inputView isEqual:self.functionView])
 5     {
 6         self.myTextView.inputView = nil;
 7         [self.myTextView reloadInputViews];
 8     }
 9     else
10     {
11         self.myTextView.inputView = self.functionView;
12         [self.myTextView reloadInputViews];
13     }
14
15     if (![self.myTextView isFirstResponder])
16     {
17         [self.myTextView becomeFirstResponder];
18     }
19 }
View Code
以上就是上面展示效果的核心代码了,在做的时候感觉难点在于如何进行屏幕适配,尤其是当屏幕横过来的时候键盘的坐标系和我们frame的坐标系不同,得做一个转换。发表博客的目的是想起到抛砖引玉的作用,有好的东西希望大家相互交流一下。笔者水平有限难免有偏颇之处,欢迎批评指正。
总浏览量
12,586次
博客园历史 8,019 腾讯云 2,559 阿里云 2,006 本站新增 2
本站阅读按浏览器在 15 分钟内去重;禁用浏览器存储时按网络地址去重。推荐按浏览器一年内去重。仅使用站内随机标识,不采集浏览器指纹。
分享这篇文章
原创内容,未经授权禁止转载。
欢迎分享原文链接。除另有署名或许可说明外,本站原创文章的著作权由青玉伏案享有;未经书面授权,禁止整篇转载、复制发布、改编传播或建立内容镜像。
版权与使用条款
- 依法属于合理使用、法定许可等情形的,按法律规定执行;引用时应注明作者、作品名称和原文链接,不得歪曲、篡改或隐去署名。
- 经书面授权使用的,请遵守约定的用途、范围与署名要求。注明出处不等同于已经取得整篇转载或其他使用授权。
- 第三方图片、引用内容和书籍封面等权利归相应权利人所有;开源代码与 Demo 按其各自许可证使用,本声明不改变已有许可。
- 本声明参考《中华人民共和国著作权法》第十条、第二十四条、第五十二条等。对侵权使用,权利人保留依法要求停止侵害并追究相应责任的权利。
请问楼主当横屏的时候表情的行数变成啦三行是怎么做的啊~3Q
@
Coder~
给自定义键盘中的ScrollView设置的水平和垂直的约束,然后在横屏的时候改变整个自定义键盘的高度,上面有相应的代码,谢谢支持~
收到~代码研究中,谢谢楼主分享!
@
Coder~
还有一点:在贴表情图片的时候需要简单的计算,上面的代码都是经测试的,应该问题不大,代码有问题的话还希望指正~谢谢继续支持!
好的~3Q~
又来找你错别字了,抛砖引玉的左右,应为作用吧,有几个应用“是”的地方,错误的用了时,还有“在”和“再”错用的情况。
@
键盘人生
哈哈!!谢谢!会及时改的!!
支持博客~看了博主写的东西受益匪浅
@
Aster0id
因为iPhone大屏的到来,自动布局的东西在以后的iOS开发中肯定很重要的,谢谢继续支持!
楼主,您好,为什么会出现-[AppDelegate managedObjectContext]: unrecognized selector sent to instance 0x7fd238c12f40这个问题的?
谢谢...
@
落魄@「不羁」
你AppDelegate里有managedObjectContext对象吗?
@
青玉伏案
非常感谢楼主的回复,你说的是managedObjectContext 属性的吗?我这里还没有,
我刚才添加了进去了,可以运行,但是现实不了那个输入框,plist文件是怎样格式填写的? 谢谢...
@
落魄@「不羁」
找一个有表情键盘的App的ipa的安装包,解压显示包内容,把里面的表情图片和plist文件拷出来在自己工程中使用即可~
楼主,能发个表情包和plist给我吗,我找的跟你的格式不一样的。。谢谢625571640@qq.com
@
落魄@「不羁」
我把上面的demo实例发你邮箱啦~请查收~谢谢支持~
谢谢楼主。。刚才把表情放上去之后,点击表情的时候 就崩溃了,
*** Terminating app due to uncaught exception 'NSInvalidArgumentException', reason: '+entityForName: nil is not a legal NSManagedObjectContext parameter searching for entity name 'HistoryImage''
@
落魄@「不羁」
我是把历史表情存在coreData中的,点击表情的时候存入数据库中,上面的显然是CoreData的问题~加我Q吧:1850087397
楼主,你好,我按照你的一步步弄,点击表情按钮后啥也没弹出来,怀疑是表情的plist文件没搞好还是怎样。不知道楼主可不可以给个demo,邮箱xq_120@foxmail,再次感谢!
楼主, 请问您能把demo发我一份么,我是初学者. 谢谢 752679736@qq.com
求demo代码,838070635@qq.com
看到一问题
//当键盘出来的时候通过通知来获取键盘的信息
//注册为键盘的监听着
NSNotificationCenter *center = [NSNotificationCenter defaultCenter];
[center addObserver:self selector:@selector(keyNotification:) name:UIKeyboardWillChangeFrameNotification object:nil];
这句话中,如果监听的事件为UIKeyboardWillChangeFrameNotification,那么点击 textView 获取焦点后,底部的toolview 不会随着键盘一起上升,如果是在模拟器内,按 command + K 模拟键盘弹出事件,那么toolView会随着键盘一起上升。
回到第一种情况,【点击 textView 获取焦点后】,查看了 keyNotification函数,发现关于toolView frame 最后的计算值都是对的,但是就是不会上升,orign.y 值为 500+。
再则,如果把 UIKeyboardWillChangeFrameNotification 改为 UIKeyboardDidChangeFrameNotification 事件,那么toolView 会上升。
这就更加不能理解了,既然 两种事件下,值的计算是一样的,toolView是同一个(这里不确定),那么为什么第一种会不起效果。
还有,如果使用,did,toolview 不会随键盘运动,突然出现,效果不好。
找到问题的答案了,引用如下,
It's AutoLayout. Something changed in iOS8 and you can't just change frame or center points anymore if you have AutoLayout enabled. You have to create an outlet(s) of your constraint (vertical space) and update it accordingly instead of changing frame position. Constraints are like any other ui control and can have an outlet. Constraint change can be animated.
Example:
[UIView animateWithDuration:[notification.userInfo[UIKeyboardAnimationDurationUserInfoKey] doubleValue] delay:0 options:[[[notification userInfo] objectForKey:UIKeyboardAnimationCurveUserInfoKey] integerValue] animations:^{
self.bottomSpaceConstraint.constant = adjustmentedValue;
[self.view layoutIfNeeded];
} completion:^(BOOL finished) {
}];
也就是说,在IOS8 以后,在键盘通知事件中,如果你原来的元素,是通过VFL布局,那么无法通过frame 的方式,来改变元素的位置,只能通过更新VFL脚本来改变元素位置。
原文链接如下:http://stackoverflow.com/questions/26112319/ios8-whats-going-on-with-moving-views-during-keyboard-transitions?answertab=active#tab-top
折腾了好久,才搞明白,希望后来者能少走点弯路【此坑已填,本人已卒】
楼主能发个demo么?邮箱zt1012@gcall.com
昂~ 博主 你这个wechat的demo 用户名跟密码是啥 怎么登录呢??
楼主,这几天学习自定义键盘,看了你的文章受益匪浅!致敬!
是不是看这个demo之前,还要研究下xmpp才能登陆进去?
嗯,刚才看了博主的关于xmpp的博客,已经找到了答案,开始研究xmpp!
@
hello,我来啦
THX~
@
青玉伏案
啥意思??
@
hello,我来啦
thanks~的意思~
哦哦,迟钝了,楼主,我在其他博客里看到你给云龙了一个群?可是我没看到群号在哪里啊?我能加进去学习吗?
@
hello,我来啦
可以啊~
呜呜,难道我们就这样聊天吗?那你告诉我群号啊??
@
hello,我来啦
博客的最上方就有群号的~